")
")
")
Shoulder Center Saar
Refixation of a torn supraspinatus tendon
We now know that a torn shoulder tendon, such as the supraspinatus tendon, cannot heal itself. The constant muscle tension on the tendon pulls the tendon further and further away from the bone, making it impossible for it to heal at its original attachment point. In everyday life, this constant muscle tension also causes the tears to grow larger over time. Similar to a run in a pair of pantyhose. Once a tendon tear occurs, it will inevitably progress over time!
A torn shoulder tendon, e.g. the supraspinatus tendon, does not heal through gymnastics!
These rotator cuff tendon tears can be healed, but only through a minor surgical procedure. The images shown illustrate the reattachment of a supraspinatus tendon to the bone. By holding the tendon firmly in place with the suture, it can grow back into the bone.
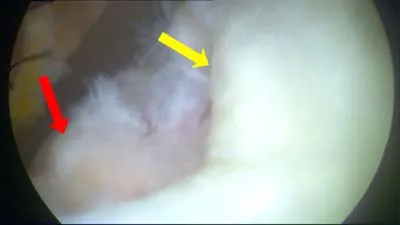
The image shows a torn supraspinatus tendon. The yellow arrow marks the free end of the torn supraspinatus tendon. This end should actually be fixed to the bone, specifically at the point marked by the red arrow. The tendon has torn and has been pulled away by approximately 1.5 cm due to natural muscle tension. Without surgical reattachment, the tendon cannot grow back to its original position.
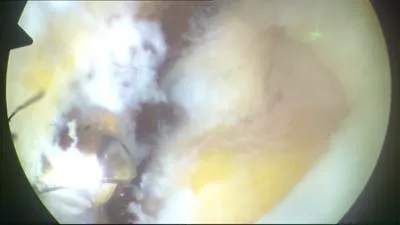
In order for the tendon to regrow or heal, a "fresh wound" must be created. Without this wound, healing is impossible. A small motorized burr is used to reshape the bone surface in the area where the tendon will later reattach. This is indicated by the yellow color in the image. Loose tissue is also removed.
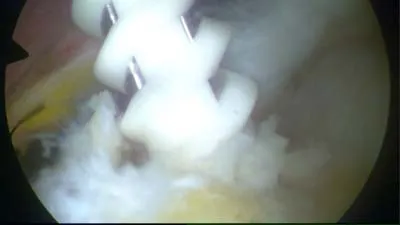
To firmly anchor the tendon to the bone, so-called suture anchors are used. These suture anchors anchor threads into the bone, which are then used to firmly reattach the tendon to the bone. In our operations, we use a state-of-the-art anchor system from Smith & Nephew: the so-called Helicoil suture anchor. This consists of a screw thread and is hollow inside. Two threads of different colors are attached inside the anchor. To screw the anchor into the bone, a hole must be pre-drilled. The image shows this drill, which simultaneously "cuts" a thread into the bone.
Once the thread cutter has been completely inserted, it is removed. A hole with a thread remains in the bone. This hole is clearly visible in the photo. The thread is also clearly visible.
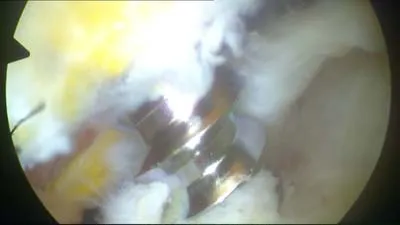
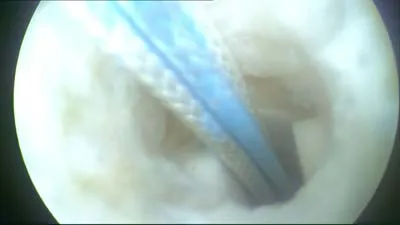
The suture anchor is then placed into the pre-drilled hole. The anchor in the picture is the so-called Helicoil Regenesorb anchor and has a diameter of 4.75mm. The special thing about this anchor is the material. It consists of a type of sugar that is absorbed by the body. The anchor dissolves in the body and the former site where the anchor was located is rebuilt with bone. A special feature of the Helicoil anchor is its special construction. Instead of a solid screw, this anchor consists only of a threaded helix. In order to be able to screw this in at all, it is supplied with a placement instrument. In the picture, the metal of the placement instrument can be seen translucently at the thread.
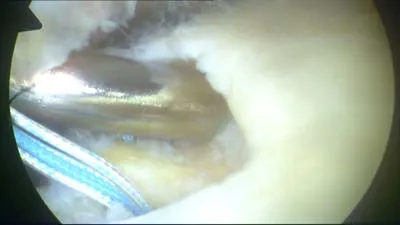
Once the anchor is fully screwed in, the insertion instrument is removed, leaving no metal in the body—only the dissolving anchor material and the sutures. The image again shows the hole in the bone. The screwed-in anchor is just visible. The two sutures are clearly visible, though. One is blue, the other is white.
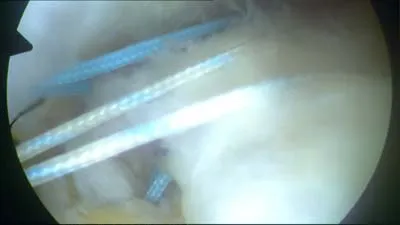
Depending on the size of the rotator cuff tear, one, two, or even more anchors are placed. In our case, two suture anchors were used. One is clearly visible in the foreground. The other can be seen under the metal rod upon closer inspection.
The stitches are then pulled through the tendon from below. Various instruments are used for this. We like to use special suture forceps. These grasp the tendon and automatically thread the stitch through it, similar to a sewing machine. These instruments are extremely helpful and significantly shorten the surgical time. Unfortunately, they are expensive and are therefore usually only used in specialized centers.

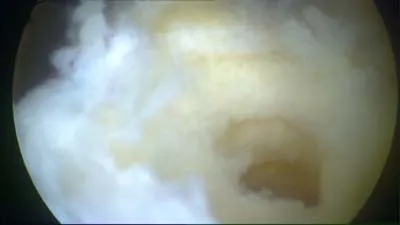
Once the individual sutures have been inserted, they are knotted in the joint. The special thing about this technique is that the knotting of the sutures takes place through tiny incisions in the skin. In this case, five incisions were necessary for the entire procedure, each no longer than half a centimeter. This means minimal surgical trauma for the patient. The skin and deltoid muscle are extremely protected with this type of operation. The photo shows the finished result of the suture. The tendon is once again firmly attached to the bone and, held in place by the sutures, can now grow back onto the bone. The two suture anchors inserted will have completely dissolved in two to three years.